I LOVE AVONLEA AND ARTISTE!
After shifting some things around in my craft room, I noticed I had several styrofoam cones. I mused to myself what crazy projects I would use them for this year. Well, crazy no more.....here it is........
My Avonlea decroative tree!
This was a fairly easy tree to make. I cut my yoyo flowers on Artiste at 1 1/2". You can get 10 from a 12 x 12 piece of cardstock or decorative paper. Before folding, I mixed some Twilight reinker with our Pearl paint and painted the styrofoam cone. Then I folded 10 each of 3 different patterns and I was ready for assembly.
I attached 3 together of the luscious Avonlea Teal pattern and just dropped them over the top of the cone. They sat nicely round the base of the cone, so after failed attempts with hot glue and Liquid Glass, I secured the paper with pins.
For the rest of the layers, I would would attach at least 2 yoyo pieces together, then measure how they would fit. By the second Avonlea Teal layer, I was removing folds to create a smaller circumference. The top layer was just one piece attached to itself. I cut a small circle of matching paper and used a glue dot to stick it to the top of the cone.
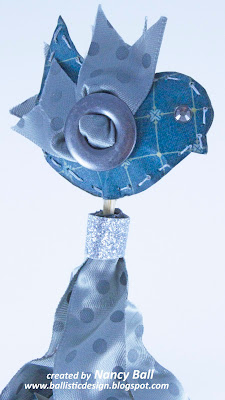
For the topper, I stamped my favourite plump bird on two left over pieces of Avonlea, then cut them out. I hand stitched them and stuffed with quilt batting for some dimension. I took our fantastic Satin Polka Dot ribbon, cut a piece in half, then threaded it through a pewter ribbon slide to create wings on both sides of the bird.
I took a wooden skewer; covered it in Avonlea Teal paper; coated the end in liquid glass; then impaled my birdie with it between stitches. While giving that some time to set, I took about a 6" piece of the same ribbon and cut it in half again. Now after watching Tresa Black make singed flowers with this ribbon, I knew that was how I would finish my ribbon edge and make it curl. I did this to 2 - 6" lengths of ribbon, on the cut edge.
I used glue dots to attach the ribbon to the skewer, then added some our wonderful adhesive backed Silver Shimmer trim. I prepoked a large hole in the top of the cone; covered the skewer end in Liquid Glass; then shoved be birdie skewer in.
VIOLA, I had finished my Avonlea decorative tree!
All supplies are Close To My Heart, unless noted.
Paper: Avonlea
Stamp: Bird Basics
Ink: Slate; Twilight reinker
Embellishments: Silver Shimmer trim; Pewter ribbon slide; Black & Grey Sparkle; Slate Satin Polka-Dot ribbon; Liquid Glass; Create-a-Shade Pearl Paint
Tools: Artiste Cricut cartridge
Other: Wooden skewer


No comments:
Post a Comment
I love reading your comments, Thank You!